

In this article we are going to learn the process of creating a REST API using Django rest framework. By the end of this article, you will be able to create a REST API which on a get request, returns a set of countries with a few details.
Prerequisites:
Python: Version >= 3.5, you may download python from Python releases.
Django: You may install Django using the following command
pip install djangoDjango rest-framework: It is a toolkit that we use to build our rest api. Again, even this can be installed using pip using the below command.
pip install djangorestframeworkWhat is a REST API?
A REST API is like an interface between two applications to exchange data between them. It supports operations like
GET- To get data from an application
PUT- To edit data that is present in an application
POST- To add new data to an application
DELETE- To delete data from an application
How to create a REST API?
Let us start by creating a django project. We can create it by executing the following command in the terminal. This will create a folder with the project name.
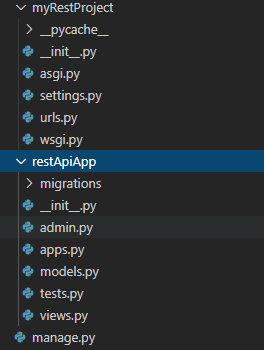
django-admin startproject myRestProjectNow, let's create a rest api app with this project using the below command.
python manage.py startapp restApiAppAfter execution of the command the folder structure may look like this.
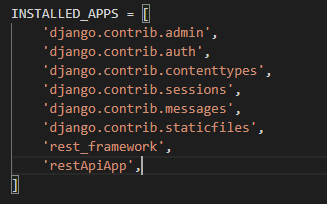
Now, let us add the restApiApp references to the Django project's settings.py file in the "INSTALLED_APPS" string list.
Now, lets create a model for the rest api. A model defiines the template to the database table that stores the actual data. We have to create our db model in the models.py file inside the created app folder.
from django.db import models

class CountryDetails(models.Model):
    name = models.CharField(max_length=15)
    nationalAnimal = models.CharField(max_length=15)
    languageSpoken = models.CharField(max_length=10)
    currentPopulation = models.IntegerField()

    def __str__(self):
        return self.name
As, we are not using any databases such as mySQL, we will use sqlite Db associated with Django. Now, Django will help us to create the Database and model<--> table interaction with the database. For that you need to execute the below command in the terminal.
python manage.py makemigrationsNow we need to apply these changes to the db by running the below command in the terminal.
python manage.py migrateOn execution of this command, the changes that are recently made will be applied to the db file inside the project.

Now lets add some sample entries to the db. You can do that by interacting with the manage.py shell. For that you need to execute the below command in the terminal to open the interactive console.
python manage.py shellThen, import the model and enter data to it using the given steps. Refer here on steps to insert data into the table.

Now, we need to create a serializer for the model. A serializer gets data from the db table which is in the for of a queryset, and converts it into a json. To do that, let's create a file named serializer in the restApiApp folder.
Then, we need to create a serializer class with a Meta method containing two properties. The model property is the name of the model, the fields property specifies what all db column fields must be serializer should consider.
from rest_framework import serializers
from .models import CountryDetails

class CountryDetailsSerializer(serializers.ModelSerializer):
    class Meta:
        model = CountryDetails
fields = '__all__'Now, we have the JSON data ready with us. All we need is a view to show it on the browser page. Let's create a view in the views.py file inside the restApiApp folder. We need to create a class that inherits from APIView of the rest framework that performs the rest operations. We can have get, post, put and delete methods here. Let us discuss about the get method here. It only has three lines of code, the first gets the data from the model, the second serializes the data that can be passed to the browser, the third takes the data and passes it as an HTTP response.
from django.shortcuts import render
from .models import CountryDetails
from rest_framework.views import APIView
from django.http import HttpResponse
from django.http import JsonResponse
from rest_framework.response import Response
from rest_framework import status
from .serializer import CountryDetailsSerializer

class CountryView(APIView):
    def get(self, request):
        data = CountryDetails.objects.all()
        serializedData = CountryDetailsSerializer(data, many=True)
return Response(serializedData.data)At this stage, you have a db that stores the values, a serializer that coverts the data to JSON and a view to render the data. The last piece of the puzzle is configuring the url end point. For that you need to go to urls.py of your project folder and create a URL endpoint for our created view.
from django.contrib import admin
from django.urls import path
from restApiApp import views

urlpatterns = [
    path('admin/', admin.site.urls),
    path('countries/', views.CountryView.as_view()),
]Done. Congratulations! You have just created a sample rest API yourself.
Testing the REST API?
To test it on your local you need to run your local server by executing the following command in the terminal.
python manage.py runserverThis will run your server on http://127.0.0.1:8000/ . Initially it shows a 404 status as that's not your configured end point. now give the end point which you configured which is "countries/" in our case and on clicking enter you will see the db entries that you saved, as a JSON response.

To get the data in the form of a raw JSON, select 'json' from the drop down beside the 'GET' button on the right.
Hope this was helpful. Thank you!