
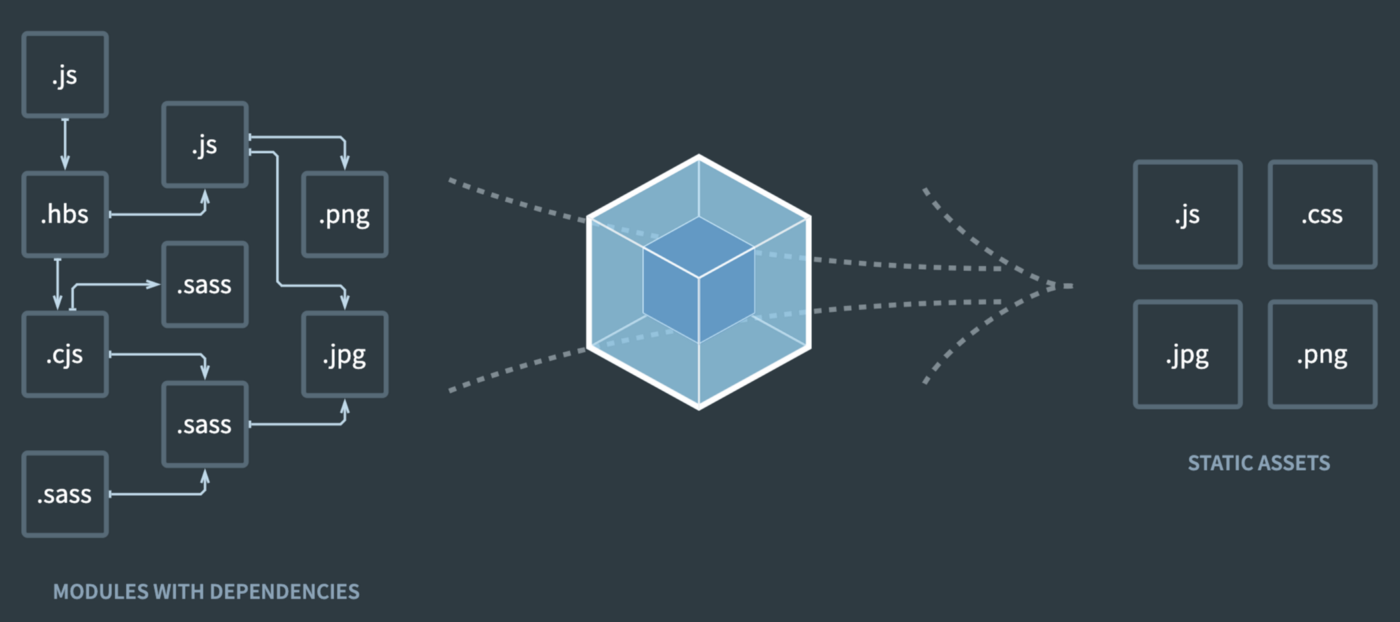
This article is a continuation of my previous webpack article located here. We have already learned so far how to compile your source code and extract css into separate css files (for production use) along with bundling using Webpack. Now it's time to minify and compress our generated css and js files for any possible production use.
If you haven't read my previous article so far, it is recommended to have a look at first before you continue reading this article.
Alright, So I am assuming you have read and understood the above stated article, so let's continue our due part.
Cache Busting
Since we've included the content hash in the generated CSS file, now is a good time to talk about cache busting. Why, you ask, would we want the content hash included in our file names? To help the browser understand when a file has changed!
Your browser tries to be helpful by caching files it has seen before. For example, if you've visited a website, and your browser had to download assets like JavaScript, CSS, or image files, your browser may cache those files so that it doesn't have to request them from the server again.
This means that if you visit the site again, your browser can use the cached files instead of requesting them again, so you get a faster page load time and a better experience.
So, what's the problem here? Imagine if we had a file called main.js used in our app. Then, a user visits your app and their browser caches the main.js file. Now, at some later point in time, you've released new code for your app. The contents of the main.js file have changed. But, when this same user visits your app again, the browser sees that it needs a main.js file, notes that it has a cached main.js file, and just uses the cached version. The user doesn't get your new code!
To solve this problem, a common practice is to include the content hash in each file's name. As discussed earlier, the content hash is a string representation of the file's contents. If the file's contents don't change, the content hash doesn't change. But, if the file's contents do change, then the content hash also changes.
Because the file name will now change when the code changes, the browser will download the new file since it won't have that specific file name in its cache.
Time to include the Content Hash
To include the content hash in our JavaScript file names, we'll modify just one line of code in our webpack.config.common.js file. This line:
filename: 'main.js'Will change to this line:
filename: '[name].[contenthash].js'So that the entire file looks like this:
const path = require('path');
const { CleanWebpackPlugin } = require('clean-webpack-plugin');
const HtmlWebpackPlugin = require('html-webpack-plugin');

module.exports = {
  entry: './src/index.js',
  output: {
    filename: '[name].[contenthash].js', // this line is the only difference
    path: path.resolve(__dirname, 'dist')
  },
  plugins: [
    new CleanWebpackPlugin(),
    new HtmlWebpackPlugin({
      filename: 'index.html',
      inject: true,
      template: path.resolve(__dirname, 'src', 'index.html'),
    }),
  ],
  module: {
    rules: [
      {
        test: /\.(js|jsx)$/,
        exclude: /[\\/]node_modules[\\/]/,
        use: {
          loader: 'babel-loader',
        },
      },
    ]
  }
};
Now if you run yarn build, you'll see that both your JavaScript and your CSS has content hashes included:
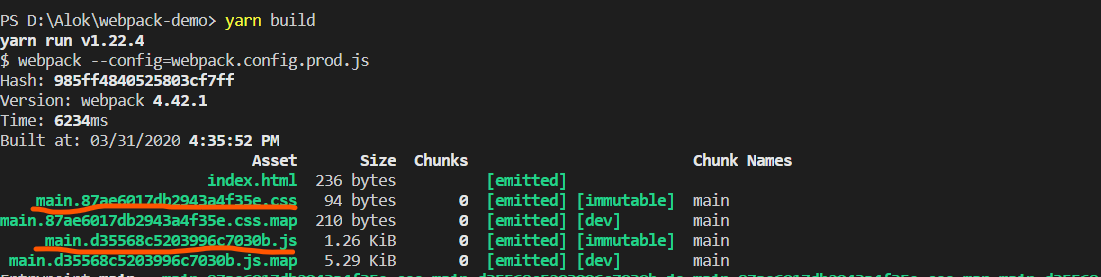
If you run yarn build again and compare your new output to your old output, you'll notice that the content hashes are exactly the same both times.
But, if you edit your ./src/index.js file in any way and then run yarn build again, you'll get a new content hash because the content has changed! Try it!
Minifying CSS
Now we want to minify our CSS. We're already minifying our JavaScript for the production build, but we're not minifying our CSS yet. Let's do that.
We can minimize our CSS by using the optimize-css-assets-webpack-plugin. Let's install that dependency now:
yarn add --dev optimize-css-assets-webpack-pluginNow we can add that to an optimization section of our webpack.config.prod.js file:
const merge = require('webpack-merge');
const MiniCssExtractPlugin = require('mini-css-extract-plugin');
const OptimizeCssAssetsPlugin = require('optimize-css-assets-webpack-plugin');
const commonConfig = require('./webpack.config.common');

module.exports = merge(commonConfig, {
  mode: 'production',
  devtool: 'source-map',
  module: {
    rules: [
      {
        test: /\.css$/,
        use: [
          MiniCssExtractPlugin.loader,
          'css-loader',
        ],
      },
      {
        test: /\.s[ac]ss$/i,
        use: [
          MiniCssExtractPlugin.loader,
          // Translates CSS into CommonJS
          'css-loader',
          // Compiles Sass to CSS
          'sass-loader',
        ],
      },
    ],
  },
  plugins: [
    new MiniCssExtractPlugin({
      filename: '[name].[contenthash].css',
    }),
  ],
  optimization: {
    minimizer: [
      new OptimizeCssAssetsPlugin({
        cssProcessorOptions: {
          map: {
            inline: false,
            annotation: true,
          },
        },
      }),
    ],
  },
});
Now if we run yarn build and then check out the contents of our dist directory, we can see that the resulting CSS is minified. Nice!
But wait! If we look at our resulting JavaScript file, it's not minified! Hmmm. It was minified before, so what happened here?
The issue is that we're now manually configuring the optimization minimizer section of our webpack config. When that section isn't in the webpack config file, webpack defaults to using its own minimizer preferences, which includes minifying JavaScript when the mode is set to production.
Since we're now overriding those defaults by adding in our preferences for minifying CSS assets, we'll need to also explicitly include instructions for how we want webpack to minify JavaScript assets.
TerserWebpackPlugin
We can minify our JavaScript files using the TerserWebpackPlugin. Let's start by installing that dependency:
yarn add --dev terser-webpack-pluginThen, in our webpack.config.prod.js file, let's add the terser-webpack-plugin to our optimization minimizer settings at the bottom of the file:
const merge = require('webpack-merge');
const MiniCssExtractPlugin = require('mini-css-extract-plugin');
const OptimizeCssAssetsPlugin = require('optimize-css-assets-webpack-plugin');
const TerserPlugin = require('terser-webpack-plugin');
const commonConfig = require('./webpack.config.common');

module.exports = merge(commonConfig, {
  mode: 'production',
  devtool: 'source-map',
  module: {
    rules: [
      {
        test: /\.css$/,
        use: [
          MiniCssExtractPlugin.loader,
          'css-loader',
        ],
      },
      {
        test: /\.s[ac]ss$/i,
        use: [
          MiniCssExtractPlugin.loader,
          // Translates CSS into CommonJS
          'css-loader',
          // Compiles Sass to CSS
          'sass-loader',
        ],
      },
    ],
  },
  plugins: [
    new MiniCssExtractPlugin({
      filename: '[name].[contenthash].css',
    }),
  ],
  optimization: {
    minimizer: [
      new OptimizeCssAssetsPlugin({
        cssProcessorOptions: {
          map: {
            inline: false,
            annotation: true,
          },
        },
      }),
      new TerserPlugin({
        // Use multi-process parallel running to improve the build speed
        // Default number of concurrent runs: os.cpus().length - 1
        parallel: true,
        // Enable file caching
        cache: true,
        sourceMap: true,
      }),
    ],
  },
});
Now if we run yarn build and look at the output in the dist directory, we should see that both our CSS files and our JavaScript files are minified. There we go!
A Note on Other Webpack Loaders
We can't cover all the awesome loaders available for other file types in this article, but be aware that there's a loader for everything imaginable! You can use file-loader or url-loader for loading images and other assets. You can use sass-loader to handle converting Sass/SCSS files to CSS before piping that output to css-loader and style-loader. Webpack can handle Less files too with less-loader if that's your preference. Last but not least Webpack has great support for typescript, you can use ts-loader to handle your typescript files in pipe with babel-loader.
And there's still more! Other advanced webpack topics include code splitting, lazy loading, tree shaking, and more!
So Moral of the story is: For any given file type, there's a loader that can handle it.
To summarize what we've learned so far:
- Webpack is a build tool for asset bundling and dependency management.
- Webpack can be configured by a config file.
- Plugins modify and extend the webpack build process.
- Loaders instruct webpack how to handle different file types.
- The
clean-webpack-plugincan be used to remove old build artifacts from thedistdirectory. - The
html-webpack-pluginhelps manage the HTML file, including injecting JavaScript into the file viascripttags. webpack-dev-servercreates a dev server to make local development easier.- It's helpful to have separate webpack configs for development and production. You can share and merge config files using the
webpack-mergeplugin. - We can handle styling our app by including loaders like
css-loader,style-loader,sass-loader,less-loader, and themini-css-extract-plugin(which functions as both a plugin and a loader). - We can include new JavaScript / Typescript syntax and features by using Babel and
babel-loaderalong withts-loaderorawesome-typescript-loader. - We can include content hashes in our file names to help with cache busting and managing new versions of our released code.
- We can minify our CSS with the
optimize-css-assets-webpack-plugin. - We can minify our JavaScript with the
terser-webpack-plugin.
Throughout this article, we've created a pretty respectable webpack config. All of these techniques we've discussed are industry standards and are common to use in enterprise-level projects.
You can find the complete webpack config files on my Github.
Thanks for reading, happy coding! :-)