

Hello there, in this article we are going to learn how to bundle (also develop in parallel) your front-end (React/Angular/Vue) apps with webpack. If you are not aware of webpack already, in short Webpack is used to compile JavaScript modules. After its installation you can access it through its CLI or API.
Getting Started
At first let's learn how to bundle any javascript files using Webpack. We will start afresh from scratch to keep it simple and understandable.
Basic Setup
mkdir webpack-demo
cd webpack-demo
npm init -y
yarn install webpack webpack-cli --save-dev
With above commands we are creating an empty folder and initializing an empty project. We will be using yarn as our package manager tool. You can install it from here if you don't have it already.
You will get a directory structure created that should look like this:
(Please note you might need to add index.html &index.js file manually at the specified location)
 webpack-demo
  |- yarn.json
+ |- index.html
+ |- /src
+   |- index.js
Let's write a few required lines in our index.html file as given below
<!doctype html>
<html>
  <head>
    <title>Webpack Training- Alok</title>
  </head>
  <body>
    <h1>Webpack Training</h1>
    <script src="./src/index.js"></script>
  </body>
</html>
Similarly open index.js file and write the code given belowconst p = document.createElement('p');
p.textContent = 'Welcome to webpack world!';
document.body.append(p);Test Run ?
Let's give it a test run to see the output in browser. Webpack 4 is set up as a "zero config" tool, meaning that you can run it out of the box without doing any initial configuration. For enterprise projects we might need to do some config but for now we can run it. So, let's check it out. Run:
yarn webpackYou should now see a dist directory created in your project directory. And inside it you should see a main.js file, which is our minified code.
Great! Webpack appears to be working.
Reference the Output Code
Ok, now that we have JavaScript code in our dist directory, let's have our index.html file reference that. Instead of the script tag looking like this:
<script src="./src/index.js"></script>Let's change it to this:
<script src="./dist/main.js"></script>Now, refresh the page in your browser, and you should still see the exact same output, only this time the "Welcome to webpack world!" text is being generated by the ./dist/main.js file now.
Now It's time to learn How to create a production ready webpack config file.
So let's learn it step by step here:
Creating a Webpack Config File
Ok, now that we have webpack installed and have gone through a quick sanity check exercise, let's create an actual webpack config file. We'll create a file called webpack.config.js and place the following code inside it: (remember to install path )
const path = require('path')

module.exports = {
  entry: './src/index.js',
  output: {
    filename: 'main.js',
    path: path.resolve(__dirname, 'dist')
  }
}
The entry property tells webpack where our source code is located. It is the "entry point" for our app.
The output property tells webpack what to call the output file and which directory to place it in.
Simple enough, right?
Now let's create an npm script in our package.json file:"scripts": {
"build": "webpack --config=webpack.config.js"
}Now we can run our build process with the command yarn build. Go ahead and run that command to verify you have things set up properly. You could even delete your dist directory prior to running the yarn build command to verify that the directory is being generated.
Webpack Plugins
Webpack has a rich ecosystem of modules called "plugins", which are libraries that can modify and enhance the webpack build process. We'll explore a handful of helpful plugins as we continue to improve our webpack config throughout the rest of this article.
1. CleanWebpackPlugin
Ok, back to our problem. It'd be nice if we could clean up the dist directory before each new build. There's a plugin for that!
We can use the CleanWebpackPlugin to help us here. First, we need to install it in our project:
yarn add --dev clean-webpack-pluginTo use it, we'll simply require the plugin in our webpack.config.js file and then include it in the plugins array in our config setup:
const path = require('path');
const { CleanWebpackPlugin } = require('clean-webpack-plugin');

module.exports = {
  entry: './src/index.js',
  output: {
    filename: 'main.js',
    path: path.resolve(__dirname, 'dist')
  },
  plugins: [
    new CleanWebpackPlugin()
  ]
};
Now run yarn build again, and you should see dist directory getting deleted and recreated with new file. Problem solved!
2. HTMLWebpackPlugin
One other thing that's a little annoying with our setup is that any time we change the output file name in our webpack.config.js file, we also have to change that file name we reference in our script tag in our index.html file. Wouldn't it be nice if webpack could manage that for us?
There's a plugin for that! We can use the HTMLWebpackPlugin to help us manage our HTML file. Let's install it in our project now:
yarn add --dev html-webpack-pluginOk, now let's move ourindex.htmlfile inside oursrcdirectory so that it's a sibling to theindex.jsfile.
webpack-demo
 |_ src
    |_ index.html
    |_ index.js
 |_ yarn.lock
We can now delete thescripttag in ourindex.htmlfile since we'll have webpack handle inserting the appropriatescripttag for us.
Now let's require this plugin in our webpack.config.js file and then include it in the plugins array in our config setup, just like we did for the first plugin:
const path = require('path');
const { CleanWebpackPlugin } = require('clean-webpack-plugin');
const HtmlWebpackPlugin = require('html-webpack-plugin');

module.exports = {
  entry: './src/index.js',
  output: {
    filename: 'main.js',
    path: path.resolve(__dirname, 'dist')
  },
  plugins: [
    new CleanWebpackPlugin(),
    new HtmlWebpackPlugin({
      filename: 'index.html',
      inject: true,
      template: path.resolve(__dirname, 'src', 'index.html'),
    }),
  ]
};
In those options for the HtmlWebpackPlugin, we specify the filename for what we'd like the output file to be called.
We specify for inject that we would like our JavaScript file to be injected into the body tag by setting the value to true.
And finally, for the template we supply the location of our index.html file in the src directory.
Ok, it's time to ensure everything is working properly. Run yarn build, and verify that you see two files in your dist directory: index.html and main.js.
If you look closely in your index.html file, you'll see the main.js file referenced.
Now, open the ./dist/index.html file in your browser to verify that your page loads correctly. If you followed these steps correctly, your page will be working.

Create a Development Server
We've made really good improvements so far using the CleanWebpackPlugin and the HtmlWebpackPlugin. As we've made these changes, still we need to manually run the yarn build command each time to see new changes in our app. We've also just been viewing the file in our browser rather than viewing the content served from a server running locally. Let's improve our process by creating a development server.
We'll use webpack-dev-server to automate our process. At first, we'll need to install it:
yarn add --dev webpack-dev-serverNow, let's split up our single webpack.config.js file into two separate config files, one for production and one for development. We'll call the file for production webpack.config.prod.js and the file for development webpack.config.dev.js.
Development Webpack Config
Here's our development config file:
const path = require('path');
const { CleanWebpackPlugin } = require('clean-webpack-plugin');
const HtmlWebpackPlugin = require('html-webpack-plugin');

module.exports = {
  mode: 'development',
  devtool: 'inline-source-map',
  devServer: {
    contentBase: path.resolve(__dirname, 'dist'),
  },
  entry: './src/index.js',
  output: {
    filename: 'main.js',
    path: path.resolve(__dirname, 'dist')
  },
  plugins: [
    new CleanWebpackPlugin(),
    new HtmlWebpackPlugin({
      filename: 'index.html',
      inject: true,
      template: path.resolve(__dirname, 'src', 'index.html'),
    }),
  ]
};
Note that we've specified the mode as development now, and we've specified that we would like an inline-source-map for our JavaScript files, meaning that a source map is included at the end of each JavaScript file. For our dev server, we've specified that our content will be found in the dist directory.
All the rest of the development config has stayed the same.
Production Webpack Config
Now, here's our production config file:
const path = require('path');
const { CleanWebpackPlugin } = require('clean-webpack-plugin');
const HtmlWebpackPlugin = require('html-webpack-plugin');

module.exports = {
  mode: 'production',
  devtool: 'source-map',
  entry: './src/index.js',
  output: {
    filename: 'main.js',
    path: path.resolve(__dirname, 'dist')
  },
  plugins: [
    new CleanWebpackPlugin(),
    new HtmlWebpackPlugin({
      filename: 'index.html',
      inject: true,
      template: path.resolve(__dirname, 'src', 'index.html'),
    }),
  ]
};
This file also looks very similar to our original config file. Here we've specified that the mode is production and that we would like the source-map option for source maps, which provides separate source map files for minified code.
Production and Development NPM Scripts
Finally, let's add a few more npm scripts in our package.json file so that we can work with our development and production webpack configs:
"scripts": {
  "build": "webpack --config=webpack.config.prod.js",
  "build-dev": "webpack --config=webpack.config.dev.js",
  "start": "webpack-dev-server --config=webpack.config.dev.js --open"
}
Now, let's try out each of these scripts.
Run yarn build to see the production build output. You should see that the main.js file in your dist directory is minified and that it has an accompanying main.js.map source map file.
Now run yarn build-dev to see the development build output. You should see the main.js file in your dist directory, but now note that it is not minified.
Lastly, run yarn start to start up the development server. This will open up the app on http://localhost:8080/. No more having to view the files directly by just pulling them into your browser! We now have a real live development server!
The output you see should still look the same as it always has:

Making changes during Development
Now that we have a working dev server, let's experiment with making some simple changes to our ./src/index.js file. Instead of outputting "Welcome to webpack world!", let's change it to say "Welcome to webpack world served using dev server!!".
Save the file, and then see the page on your dev server automatically reload and update for you! That'll be a nice boost to your developer productivity.

Don't Repeat Yourself (DRY)
Now that we have two separate webpack config files, one for development and one for production, you may have noticed that we have a lot of duplicated code between the two files.
If you find yourself writing the same code in multiple places, it may be a good idea to turn that into shared code that can be written in one place and then used in multiple places. That way when you need to make changes, you only need to implement those changes in one place.
So, how can we clean up the duplication in our webpack config files? There's a plugin for that!
3. WebpackMerge
We can use the webpack-merge plugin to manage shared code that multiple config files rely on. To do this, we'll first install the package:
yarn add --dev webpack-mergeNow we'll create a third webpack config file called webpack.config.common.js. This is where we'll keep our shared code. Right now, our development and production config files share the same entry point, output, and plugins. All that differs between the two files are the mode, source map, and dev server.
So, the contents of our webpack.config.common.js file will be:
const path = require('path');
const { CleanWebpackPlugin } = require('clean-webpack-plugin');
const HtmlWebpackPlugin = require('html-webpack-plugin');

module.exports = {
  entry: './src/index.js',
  output: {
    filename: 'main.js',
    path: path.resolve(__dirname, 'dist')
  },
  plugins: [
    new CleanWebpackPlugin(),
    new HtmlWebpackPlugin({
      filename: 'index.html',
      inject: true,
      template: path.resolve(__dirname, 'src', 'index.html'),
    }),
  ]
}
And now, we can merge this shared config object into our development config like this:
const path = require('path')
const merge = require('webpack-merge');
const commonConfig = require('./webpack.config.common');


module.exports = merge(commonConfig, {
  mode: 'development',
  devtool: 'inline-source-map',
  devServer: {
    contentBase: path.resolve(__dirname, 'dist'),
  },
});
And we can merge the shared config object into our production config like this:
const merge = require('webpack-merge');
const commonConfig = require('./webpack.config.common');

module.exports = merge(commonConfig, {
  mode: 'production',
  devtool: 'source-map',
});
Look how cleaner and shorter those two files look! Beautiful! isn't it ?
Styling Our App
Things are looking pretty good with our webpack configs so far. We have a working dev server and we've split out our code into development, production, and shared configuration files.
Let's start working on styles now. The plain black and white page is a little boring to look at. Let's style it up!
In oursrcdirectory, let's create anindex.cssfile and place the following lines of CSS inside it:
body {
  background: deeppink;
  color: white;
}
Then, in our ./src/index.js file, let's import that CSS file:
import './index.css'Now, run yarn start to get our development server running again.
Oh no! We get an error!
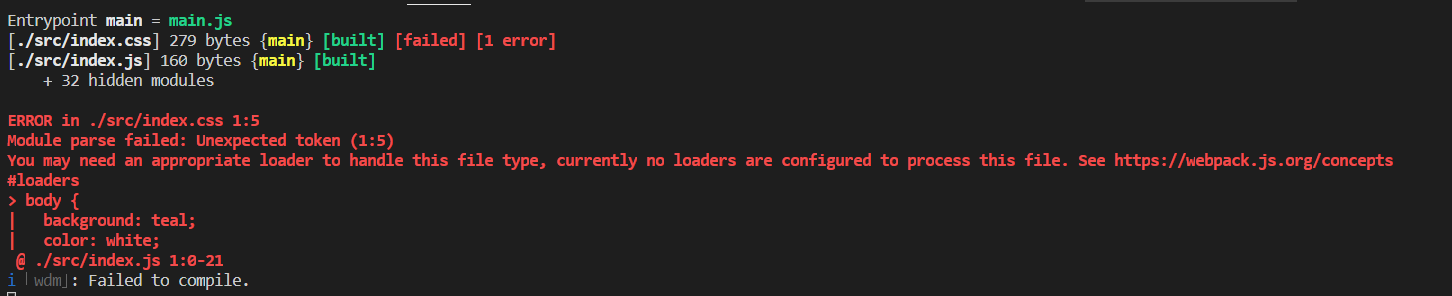
What are these "loaders" it speaks of? Let's learn about them quickly..
Webpack Loaders
Earlier, we discussed webpack plugins, which let you extend the webpack build process. There is also an ecosystem of webpack "loaders", which help webpack know how to understand and load different file types. Out of the box, webpack understands how to handle our JavaScript files, but it doesn't know what to do with CSS files yet. Let's fix that.
StyleLoader and CSSLoader
There are two loaders in particular that will be helpful for us here: style-loader and css-loader. Let's get those included in our project and then discuss how they work.
To start, as always, we'll need to install those two dependencies:
yarn add --dev style-loader css-loaderThen we can add them to our webpack.config.common.js file in the module rules section down at the bottom:
  module: {
    rules: [
      {
        test: /\.css$/,
        use: ['style-loader', 'css-loader']
      }
    ]
  }
This section sets up rules for webpack so it knows what to do with each file it encounters. The test property is a regular expression that webpack checks against the file name. In this case, we want to handle files with a .css extension.
Then, the use property tells webpack what loader or loaders to use to handle files matching the criteria. Note that the order here matters!
Webpack loaders are read from right to left. So first the css-loader will be applied, and then the style-loader will be applied.
Now, what do these loaders actually do for us?
css-loader interprets and resolves imported CSS files that you reference in your JavaScript. So in this case, css-loader helps make this line work:
import './index.css'Next, style-loader injects the CSS into the DOM. By default, style-loader takes the CSS it encounters and adds it to the DOM inside a style tag.
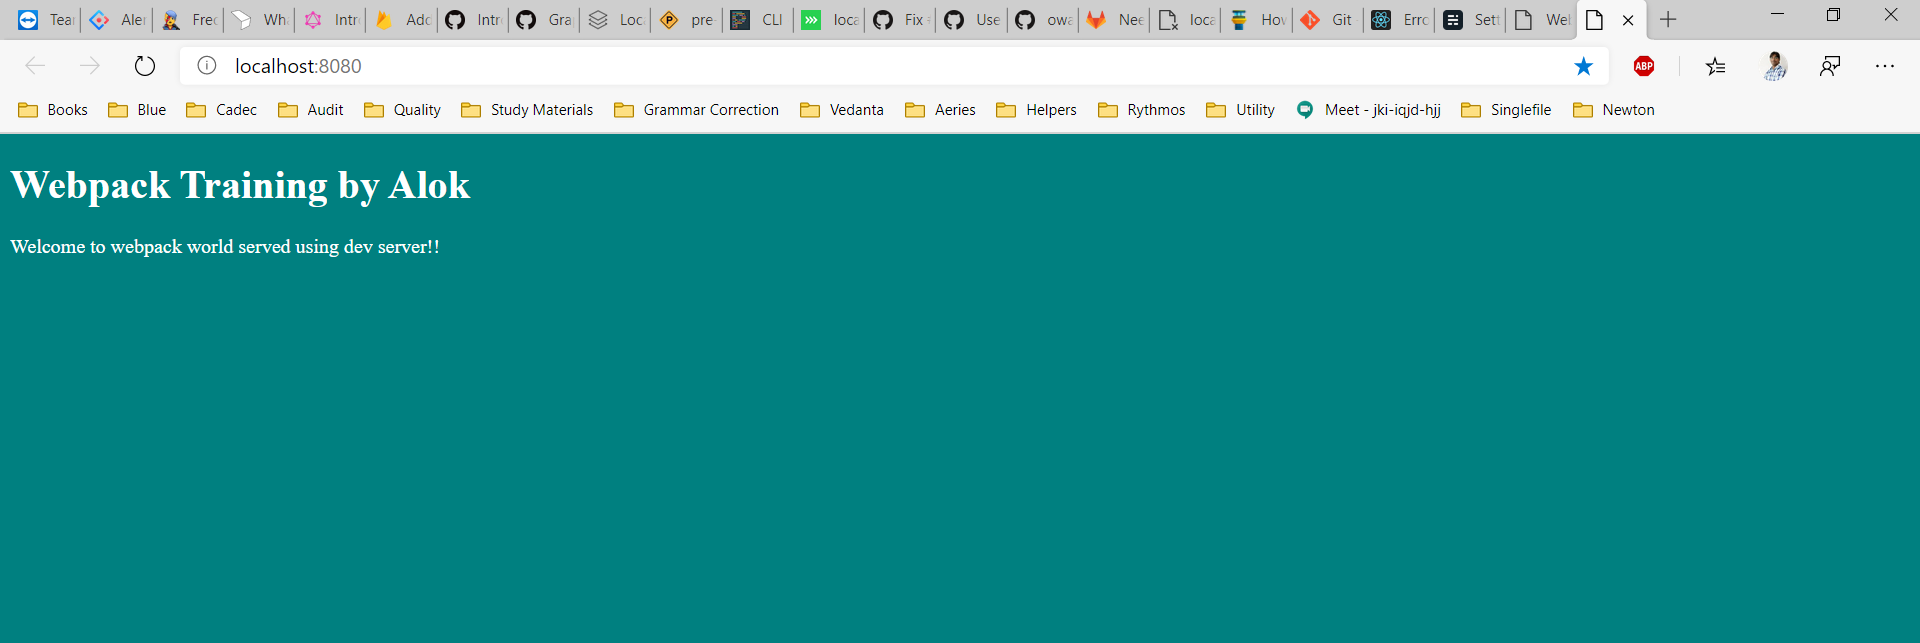
Let's restart our dev server by killing the current process (if you still have it running) and then starting it again with yarn start. Now, in the web browser, you should see this on https://localhost:8080/:
Let's add support for some modern styles rather than just sticking to css . In this example we will add support for scss and sass, similarly you can add support for less with less-loader if that's your preference.
sass-loader
To begin, you'll need to install sass-loader:
yarn add --dev sass-loader node-sass
sass-loader requires you to install either Node Sass or Dart Sass on your own (more documentation can be found below). This allows you to control the versions of all your dependencies, and to choose which Sass implementation to use.
Chain the sass-loader with the css-loader and the style-loader to immediately apply all styles to the DOM or the mini-css-extract-plugin to extract it into a separate file.
Then add the loader to your Webpack configuration. For example:
In oursrcdirectory, let's create anindex.scssfile and place the following lines of CSS inside it:
$body-color: teal;
$text-color: #ff880d;


body {
  background: $body-color;
  color: $text-color;
}
Again, in our ./src/index.js file, let's import that SCSS file, instead of old css file:
import './index.scss'Lets modify our webpack.config.common.js file to include rules for scss
module: {
rules: [
{
test: /\.css$/,
use: ['style-loader', 'css-loader']
},
{
test: /\.s[ac]ss$/i,
use: [
// Creates `style` nodes from JS strings
'style-loader',
// Translates CSS into CommonJS
'css-loader',
// Compiles Sass to CSS
'sass-loader',
],
},
]
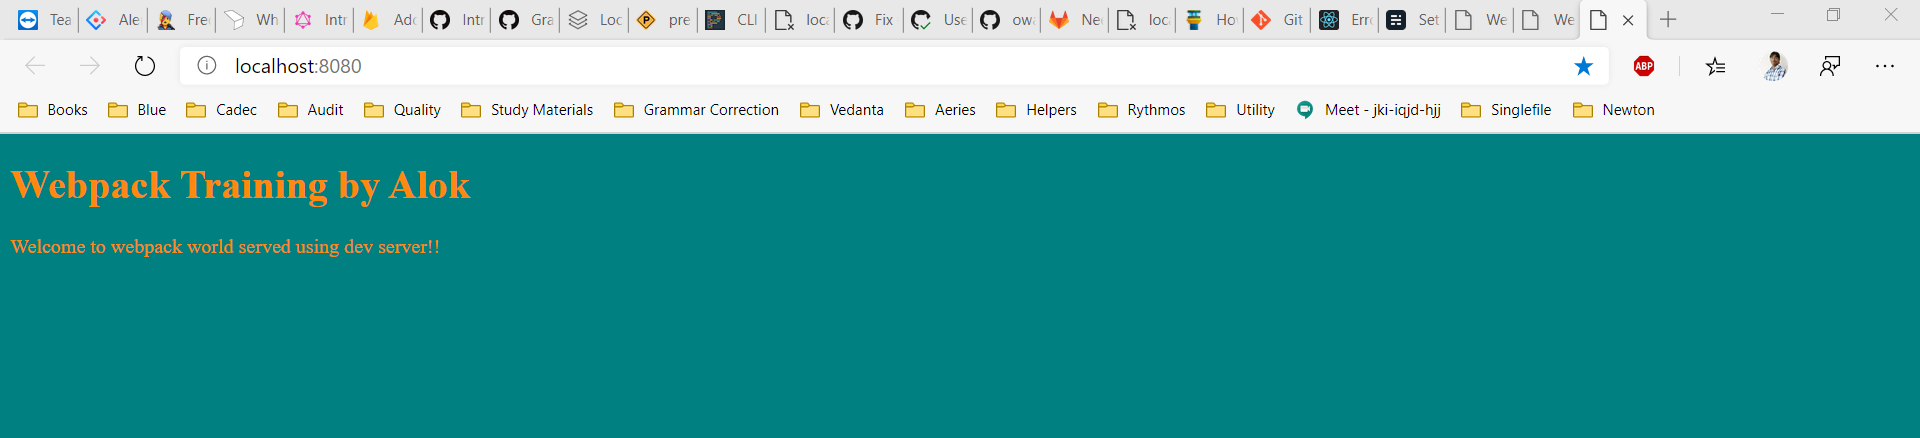
}Now restart the process to see it in action. Open your web browser to see this on https://localhost:8080/:
Support for Modern Javascript:
So far we've written just a few lines of JavaScript so far. It'd be nice if we could write our JavaScript using new features that aren't well-supported in every browser yet. Babel is a JavaScript compiler that can turn ES6+ code into ES5 code.
And (you guessed it), there's a loader for that: babel-loader.
BabelLoader
To set up babel-loader, we'll follow the instructions on their installation guide linked above.
First, we'll install our dependencies:
yarn add --dev babel-loader @babel/coreNext, we'll add a new rule to our module rules array in our webpack.config.common.js file:
module: {
    rules: [
      {*Css rules here, I am removing the common part to keep it small*},
      {
        test: /\.(js|jsx)$/,
        exclude: /[\\/]node_modules[\\/]/,
        use: {
          loader: 'babel-loader',
        },
      },
    ]
 }
This will tell webpack that when it encounters .js or .jsx files to use Babel to transform the code. We use the exclude property to make sure Babel doesn't try to transform Javascript files in our node_modules directory. Those are third-party dependencies that should already have been taken care of by their creators.
Next, we'll add one more dependency for a Babel preset:
yarn add --dev @babel/preset-envAnd then we'll create a .babelrc file where we can do other Babel configuration as needed. We'll keep our file pretty simple and just specify the Babel preset that we want to use:
{
  "presets": ["@babel/preset-env"]
}And finally, let's write some ES6 code in our ./src/index.js file:import './index.scss';
const p = document.createElement('p');
p.textContent = 'Welcome to webpack world served using dev server!!';
document.body.appendChild(p)
const p2 = document.createElement('p')
const numbers1 = [1, 2, 3, 4, 5, 6]
const numbers2 = [7, 8, 9, 10]
const numbers3 = [...numbers1, ...numbers2]
p2.textContent = numbers3.join(' ')
document.body.appendChild(p2)
This is a really trivial example, but we're using the spread operator here to concatenate two arrays.
Now, if we kill our running process and run yarn start again, we should see this in the browser:

Great everything worked as expected, but there are a few minor flaws..
If you disable the cache in your browser and reload the page for our demo app, you may notice a slight blip in which the page appears with just the un-styled HTML, and then the page background turns teal and the text turns orange as the styles are applied.
This behavior results from how style-loader works. As mentioned above, style-loader takes CSS and places it in a style tag in your HTML. Because of that, there's a brief period of time in which the style tag hasn't been appended yet!
Now, this is ok for a development environment, but we definitely wouldn't want this kind of behavior occurring in production. Let's fix that.
MiniCssExtractPlugin
Rather than injecting CSS into our HTML as style tags, we can use the MiniCssExtractPlugin to generate separate CSS files for us. We'll use this in our production config while still just using style-loader in our development config.
First, let's install the dependency in our project:
yarn add --dev mini-css-extract-pluginNow in our webpack.config.common.js file let's remove the CSS rule since we'll be handling this differently in development and production. We're left with this in our shared config:
const path = require('path');
const { CleanWebpackPlugin } = require('clean-webpack-plugin');
const HtmlWebpackPlugin = require('html-webpack-plugin');

module.exports = {
  entry: './src/index.js',
  output: {
    filename: 'main.js',
    path: path.resolve(__dirname, 'dist')
  },
  plugins: [
    new CleanWebpackPlugin(),
    new HtmlWebpackPlugin({
      filename: 'index.html',
      inject: true,
      template: path.resolve(__dirname, 'src', 'index.html'),
    }),
  ],
  module: {
    rules: [
      {
        test: /\.(js|jsx)$/,
        exclude: /[\\/]node_modules[\\/]/,
        use: {
          loader: 'babel-loader',
        },
      },
    ]
  }
};
Now, in our webpack.config.dev.js file, let's add back in style-loader and css-loader that we just removed from our shared config:
const path = require('path');
const merge = require('webpack-merge');
const commonConfig = require('./webpack.config.common');


module.exports = merge(commonConfig, {
  mode: 'development',
  devtool: 'inline-source-map',
  devServer: {
    contentBase: path.resolve(__dirname, 'dist'),
  },
  module: {
    rules: [
      {
        test: /\.css$/,
        use: ['style-loader', 'css-loader']
      },
      {
        test: /\.s[ac]ss$/i,
        use: [
          // Creates `style` nodes from JS strings
          'style-loader',
          // Translates CSS into CommonJS
          'css-loader',
          // Compiles Sass to CSS
          'sass-loader',
        ],
      },
    ]
  }
});
And finally, in our webpack.config.prod.js file, let's add in our new mini-css-extract-plugin:
const merge = require('webpack-merge');
const MiniCssExtractPlugin = require('mini-css-extract-plugin');
const commonConfig = require('./webpack.config.common')

module.exports = merge(commonConfig, {
  mode: 'production',
  devtool: 'source-map',
  module: {
    rules: [
      {
        test: /\.css$/,
        use: [
          MiniCssExtractPlugin.loader,
          'css-loader',
        ],
      },
      {
        test: /\.s[ac]ss$/i,
        use: [
          // Load css to separate file
          MiniCssExtractPlugin.loader,
          // Translates CSS into CommonJS
          'css-loader',
          // Compiles Sass to CSS
          'sass-loader',
        ],
      },
    ],
  },
  plugins: [
    new MiniCssExtractPlugin({
      filename: '[name].[contenthash].css',
    }),
  ]
})
This one is a little different because it actually is both a plugin and a loader, so it goes in the module rules and in the plugins sections.
Also note that we use the square brackets in our file name to dynamically set the name to the original source file's name and also include the contenthash, which is a hash (an alphanumeric string) that represents the file's contents.
Now if you run yarn build this time to generate the production build, you should get some output in your terminal that looks like this:
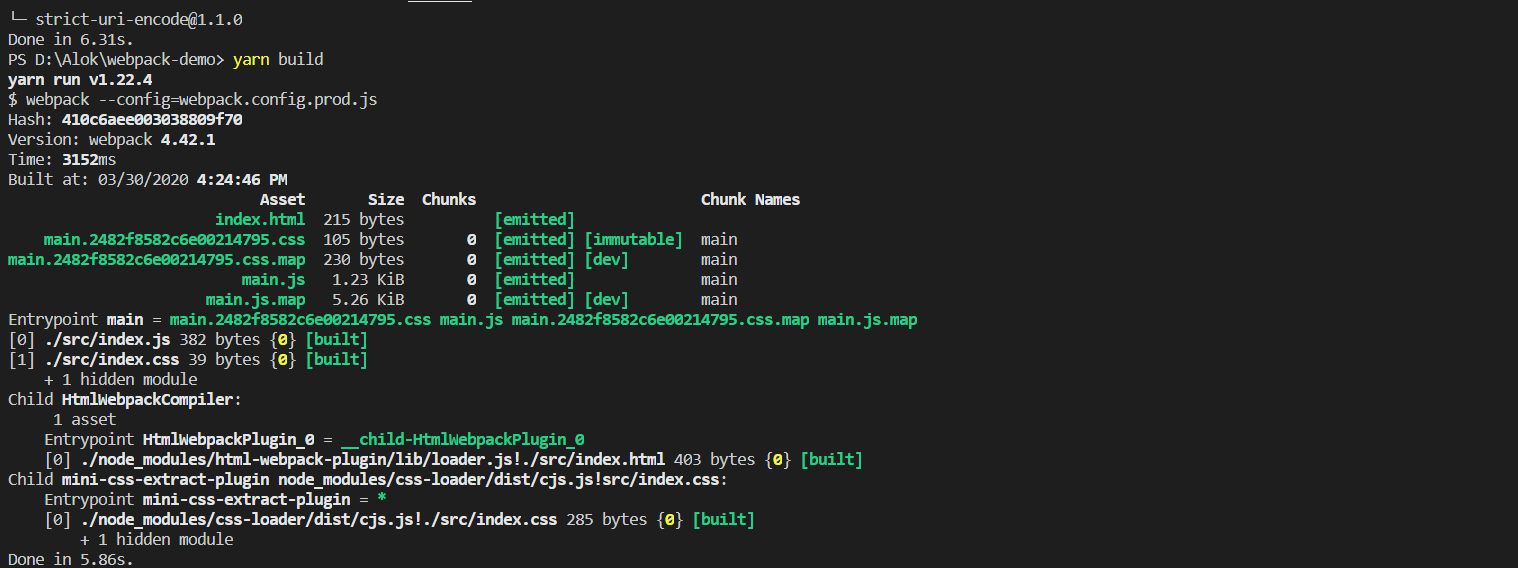
Note that it actually generates a CSS file now, and the content hash is included in the file name.
That's all folks! I hope you enjoyed learning Webpack so far. Source code for the configs used here are available on my Github
If you are further interested in learning about minifying cssand js files for production use it is available right here in this article.